** There are other private ranges, too, but most people don't need to know about those, 192.168.1.something is what most folk use, and though thousands of millions of machines in the world have 192.168.1.something as their private IP address, they don't interfere with each other because they are behind NATs and other gateways; from the outside, we only see the public IP address, aka. "external IP".
HOWEVER, if your router uses 192.168.0.something, or 10.0.0.something, or something else from the private IP ranges..
10.0.0.0 - 10.255.255.255
172.16.0.0 - 172.31.255.255
192.168.0.0 - 192.168.255.255
..then don't hesitate to use THAT instead of the 192.168.1.something addresses I use in my examples, that's what most routers use, but not all. Do check.
The best way to know what subnet your router uses, and thereby which IP to use, is to look and see what IP it has currently assigned to your computer. In Windows, it's in the Support tab of the connexion's Status dialog. A netstat command will get you the same information (and more) on most platforms, perhaps netstat -n. Your router's web interface will likely have all this information, too.
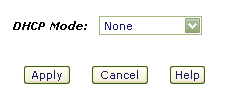
Remember to disable dhcp in your router before you start assigning static IP's.

Alternatively, create a new dhcp range somewhere away from your regular static IP's, handy for guests and what-not, perhaps 192.168.1.50 - 192.168.1.99
Fortunately, assigning a static IP is very easy to achieve, and the same principle applies to every computing platform, the only real difference being where to apply the settings. I'll start with the trickiest..
Windows®..
The dialog you are looking for is here..Control Panel >> Network Connections >> Local Area Connection >> Properties >> TCP/IP >> Properties
*phew*
In other words, open the control panel, open Network Connections, right-click the "Local Area Connection" (unless you've renamed it to something else) and chose "Properties", then (in the "general" tab) select "Internet Protocol(TCP/IP)" and click the "Properties" button. Check the "Use the Following IP address" checkbox and enter your desired IP address. If you use 192.168.1.3 as your IP address, the dialog will look something like this..

..which is a clever screencap, showing you just how to get there. When you're done, okay everything to close all the dialogs. It's smart to use 192.168.1.3 as your address, especially if you plan to use any of the ready-made script kicking around here.
I you are plugging your computers into a network switch (Good Idea!), it's also smart to plug each machine into its corresponding CAT-5 socket, router (192.168.1.1) into the first, 192.168.1.3 into the third, and so on.


